레이블이 computer vision인 게시물을 표시합니다. 모든 게시물 표시
OpenCV - 16bit unsigned int 깊이 이미지 저장하기/불러오기

OpenCV - 16bit unsigned int 깊이 이미지 저장하기/불러오기

깊이 이미지를 저장할때 각 pixel마다 미터단위로 저장하면 소수점으로 표현해야하므로 float형으로 저장해야한다. 그렇게 되면 낭비되는 메모리가 많으므로 보통은 밀리미터 단위로 저장한다. 즉, 16bit unsigned int(uint16_t)형을 주로 사용해 저장하게 된다. 물론 사용할 때는 다시 프로그램에서 원하는 단위로 변경해주면 된다.

RGB이미지와는 포맷이 다르므로 OpenCV를 이용해 저장하거나 불러올때 약간 다르다. 깊이 이미지는 libRealsense를 이용해 받는다고 가정한다.


  • 저장하기

1
2
3
4
5
cv::Mat depth(480640, CV_16U, (uint16_t*)dev->get_frame_data(rs::stream::depth_aligned_to_color));
std::vector<int> param;
param.push_back(CV_IMWRITE_PNG_COMPRESSION);
param.push_back(0);
cv::imwrite("depthimage.png",depth,param);
cs

저장 parameter를 vector로 넘겨준다. 자세한 옵션들과 사항들은 http://docs.opencv.org/3.0-beta/modules/imgcodecs/doc/reading_and_writing_images.html 에서 확인할 수 있다.


  • 불러오기

1
2
3
4
5
6
7
8
9
10
11
12
13
14
cv::Mat dep_img(cv::imread("depthimage.png", CV_LOAD_IMAGE_ANYDEPTH));
if (!dep_img.data) {
    std::cout << "No " << path << " image." << std::endl;
    exit(-1);
}
cv::Mat dep_img_meter(dep_img.size().height, dep_img.size().width, CV_32F);
dep_img.convertTo(dep_img, CV_16U);
//uint16 --> float (mm->m)
for (int u = 0; u < color_size_height_; u++){
    for (int v = 0; v < color_size_width_; v++){
        int idx = v + u*color_size_width_;
        dep_img_meter.at<float>(u, v) = (1.0f / 1000.0f)*dep_img.at<uint16_t>(u, v);
    }
}
cs

마찬가지로 위의 링크에서 자세한 내용들을 확인 할 수 있다. 읽어올 때 RGB인지 RGBA인지 깊이 이미지처럼 1개의 채널만 가지고 있는지 알려주는 parameter가 있다. 1개의 채널만 있는 깊이 이미지이므로 CV_LOAD_IMAGE_ANYDEPTH파라미터를 넣었다. 기본적으로 이미지를 8비트단위로 끊어 읽는다. 그런데 이 이미지는 저장할 때 unsigned 16비트형으로 저장되어 있었기 때문에 convetTo로 포멧을 변형 시켜 읽는다. 자세한 사항들은 역시 Opencv 레퍼런스에 나와있다.
http://docs.opencv.org/2.4/doc/tutorials/introduction/display_image/display_image.html
RealSense 카메라 사용(2) - 카메라 연결과 이미지 로드


이전 글(http://sereto.blogspot.kr/2016/11/realsense-1.html)에서 Realsene Camera들을 소개했습니다. 그럼 이번편에서는 그 Hardware를 사용할 방법들에 대해서 알아보겠습니다. 사용하는 방법엔 두 가지가 있습니다. 하나는 Realsense SDK를 사용하는 것 그리고 libRealsense를 사용하는 것입니다. 

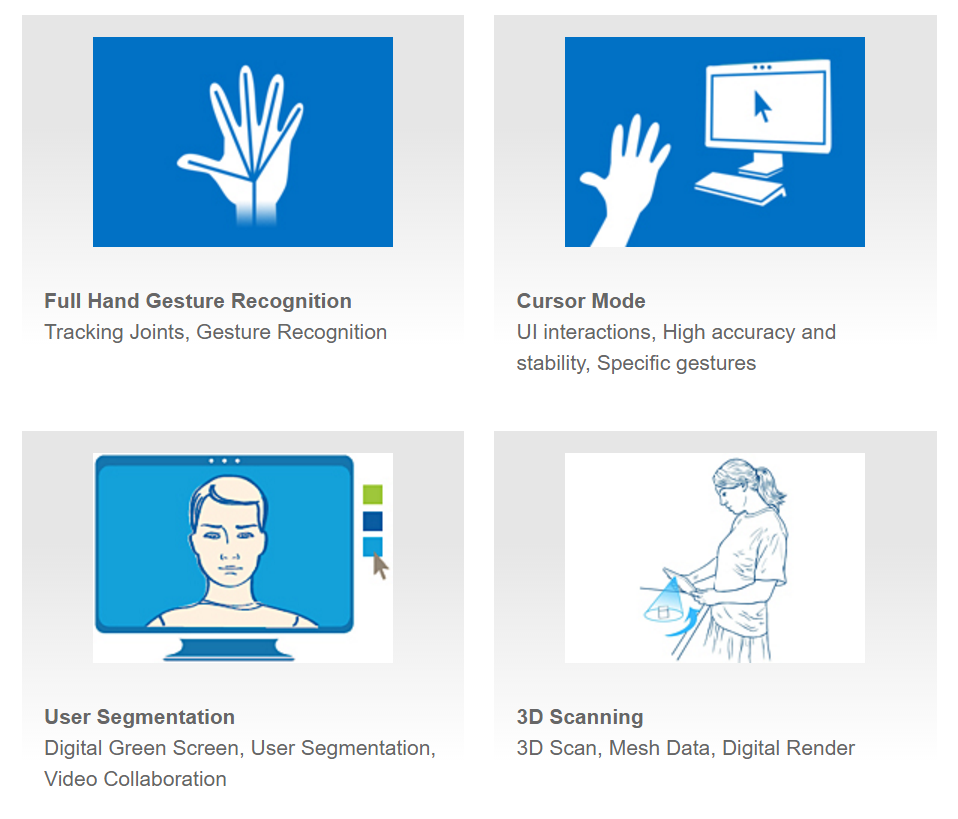
SDK에는 유용한 Tool들이 많이 구현되어있어 쉽게 이용가능합니다. 밑에 보는 그림과 같이 Hand tracking, gesture인식과 캘리브레이션, 얼굴인식, 표정인식, 3D scan등 realsense를 사용해서 할 수 있는 많은 것들을 구현해 놓았습니다. 그러나 윈도우에서 밖에 사용할 수 없고 무겁다는 단점이 있습니다. 
SDK's Tools
출처 - https://software.intel.com/en-us/intel-realsense-sdk

그에 반해 libRealsense는 카메라에 접근하고 카메라 셋팅하는 것이 전부이므로 훨씬 가볍고 윈도우뿐만아니라 리눅스나 맥에서도 사용가능합니다. 또한 C++말고도 python이나 java interface가 구현되어있어 활용가능합니다.

이후 글은 SDK를 활용하는 것 보다 C++에서 libRealsense로 카메라에 연결하고 카메라를 셋팅하는 방법을 다루겠습니다.

환경
librealsense는 예제 프로그램들이 잘 작성되어있어 그 것들을 잘 살펴보면 쉽게 사용방법을 익힐 수 있습니다. 그 중에서 cpp-tutorial-2-streams.cpp을 보면 color, depth, IR 이미지를 얻는 방법이 쉽게 구현되어있습니다.

헤더 파일
1
#include <librealsense/rs.hpp>
cs

Context 카메라 접근
1
2
3
4
5
6
7
8
rs::context ctx;
printf("There are %d connected RealSense devices.\n", ctx.get_device_count());
if(ctx.get_device_count() == 0return EXIT_FAILURE;
rs::device * dev = ctx.get_device(0);
printf("\nUsing device 0, an %s\n", dev->get_name());
printf("    Serial number: %s\n", dev->get_serial());
printf("    Firmware version: %s\n", dev->get_firmware_version());
cs
context는 지금 연결된 realsense device들을 관리합니다. 우선 하나의 realsense카메라만 사용하므로 0번 디바이스 하나에만 접근합니다. 

그 디바이스에서 사용할 카메라들을 밑의 코드와 같이 enable_stream을 이용해 설정할 수 있습니다. depth
1
2
3
4
5
6
7
// Configure all streams to run at VGA resolution at 60 frames per second
dev->enable_stream(rs::stream::depth, 640480, rs::format::z16, 60);
dev->enable_stream(rs::stream::color, 640480, rs::format::rgb8, 60);
dev->enable_stream(rs::stream::infrared, 640480, rs::format::y8, 60);
try { dev->enable_stream(rs::stream::infrared2, 640480, rs::format::y8, 60); }
catch(...) { printf("Device does not provide infrared2 stream.\n"); }
dev->start();
cs
depth 카메라인 경우 16비트짜리 unsigned int형을 사용하고 color카메라는 RGB각각 8비트를 사용하는 포멧입니다. IR카메라인 경우는 8비트 짜리 gray 포멧입니다. 또 R200인 경우에만 IR카메라가 두개이므로 try문에 들어가 있습니다.설정이 끝난 후에는 start함수로 작동시킵니다.

연결하고 설정방법등이 매우 직관적이고 간편합니다. 그리고 프레임마다 이미지를 얻는 것도 매우 편합니다. 
1
2
3
4
5
6
7
8
9
10
11
12
13
14
15
16
17
18
19
20
  while(1)
    {
        // Wait for new frame data
        dev->wait_for_frames()
        // depth data
        dev->get_frame_data(rs::stream::depth);
        //color image
        dev->get_frame_data(rs::stream::color);
        //infrared image
        dev->get_frame_data(rs::stream::infrared);
        // second infrared image
        if(dev->is_stream_enabled(rs::stream::infrared2))
        {
            dev->get_frame_data(rs::stream::infrared2);
        }
    }
cs

dev->get_frame_data()를 이용해 각 스트림을 얻어올 수 있습니다. 만약 opencv를 사용해 Mat형태로 메모리에 저장하고 사용하고 싶다면 밑의 코드와 같이 활용할 수 있습니다.
1
2
cv::Mat img(480640, CV_8UC3, (uchar3 *)dev->get_frame_data(rs::stream::color));
cv::Mat depth(480640, CV_16U, (uint16_t*)dev->get_frame_data(rs::stream::depth));
cs

그런데 color카메라와 depth카메라는 물리적으로 다른 곳에 설치되어있어 같은 픽셀 index가 같은 point를 가리키고 있지 않습니다. 그러므로 depth카메라를 color 카메라에 맞추던지, color를 depth카메라에 맞춘 후에 같은 index를 사용해야 하는데요. 그 작업을 카메라 사이의 extrinsic을 곱하는 등 복잡하게 할 필요없이 depth_aligned_to_color 나color_aligned_to_depth를 사용해서 같은 index로 같은 point정보를 얻어 올 수 있습니다.
그러나 카메라의 위치가 달라서 생긴 occlusion 부분의 정보는 얻을 수 없다는 단점이 있습니다. 
1
2
cv::Mat img(480640, CV_8UC3, (uchar3 *)dev->get_frame_data(rs::stream::color));
cv::Mat depth(480640, CV_16U, (uint16_t*)dev->get_frame_data(rs::stream::depth_aligned_to_color));
cs