이전 글(http://sereto.blogspot.kr/2016/11/realsense-1.html)에서 Realsene Camera들을 소개했습니다. 그럼 이번편에서는 그 Hardware를 사용할 방법들에 대해서 알아보겠습니다. 사용하는 방법엔 두 가지가 있습니다. 하나는 Realsense SDK를 사용하는 것 그리고 libRealsense를 사용하는 것입니다.
SDK에는 유용한 Tool들이 많이 구현되어있어 쉽게 이용가능합니다. 밑에 보는 그림과 같이 Hand tracking, gesture인식과 캘리브레이션, 얼굴인식, 표정인식, 3D scan등 realsense를 사용해서 할 수 있는 많은 것들을 구현해 놓았습니다. 그러나 윈도우에서 밖에 사용할 수 없고 무겁다는 단점이 있습니다.
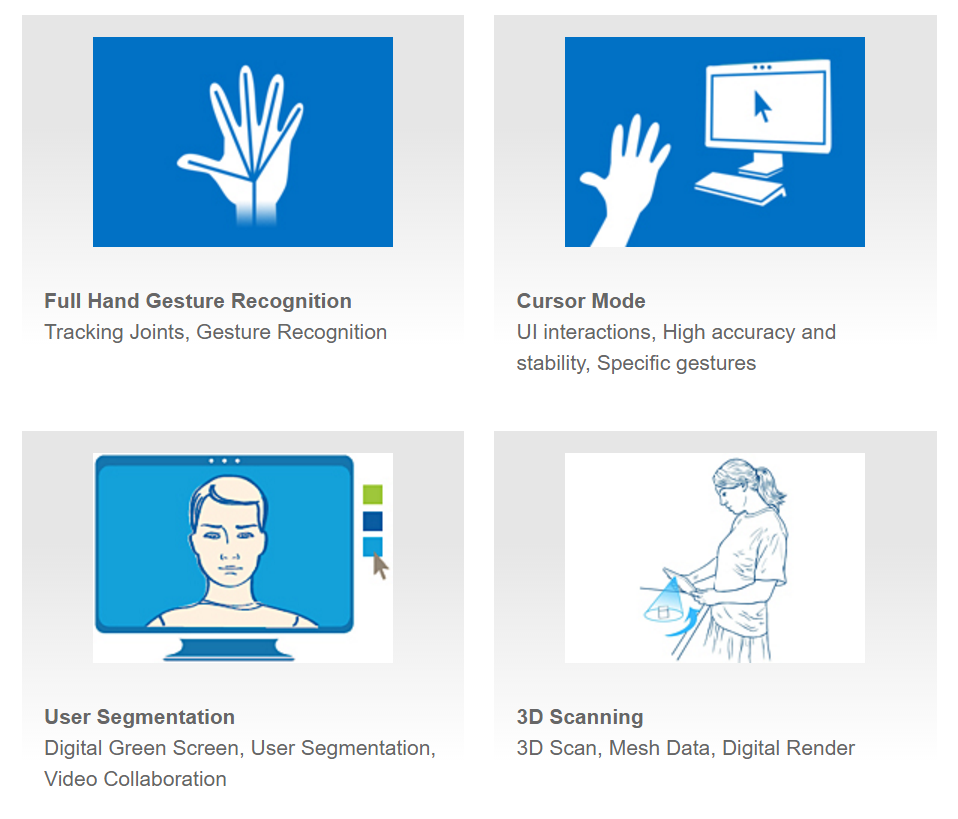 |
| SDK's Tools 출처 - https://software.intel.com/en-us/intel-realsense-sdk |
그에 반해 libRealsense는 카메라에 접근하고 카메라 셋팅하는 것이 전부이므로 훨씬 가볍고 윈도우뿐만아니라 리눅스나 맥에서도 사용가능합니다. 또한 C++말고도 python이나 java interface가 구현되어있어 활용가능합니다.
이후 글은 SDK를 활용하는 것 보다 C++에서 libRealsense로 카메라에 연결하고 카메라를 셋팅하는 방법을 다루겠습니다.
환경
- windows 10
- visual studio 2013
- Realsense R200(https://downloadcenter.intel.com/download/25044/Intel-RealSense-Depth-Camera-Manager)
- libRealsense(https://github.com/IntelRealSense/librealsense)
librealsense는 예제 프로그램들이 잘 작성되어있어 그 것들을 잘 살펴보면 쉽게 사용방법을 익힐 수 있습니다. 그 중에서 cpp-tutorial-2-streams.cpp을 보면 color, depth, IR 이미지를 얻는 방법이 쉽게 구현되어있습니다.
헤더 파일
1
|
#include <librealsense/rs.hpp>
| cs |
Context 카메라 접근
1
2
3
4
5
6
7
8
|
rs::context ctx;
printf("There are %d connected RealSense devices.\n", ctx.get_device_count());
if(ctx.get_device_count() == 0) return EXIT_FAILURE;
rs::device * dev = ctx.get_device(0);
printf("\nUsing device 0, an %s\n", dev->get_name());
printf(" Serial number: %s\n", dev->get_serial());
printf(" Firmware version: %s\n", dev->get_firmware_version());
| cs |
context는 지금 연결된 realsense device들을 관리합니다. 우선 하나의 realsense카메라만 사용하므로 0번 디바이스 하나에만 접근합니다.
그 디바이스에서 사용할 카메라들을 밑의 코드와 같이 enable_stream을 이용해 설정할 수 있습니다. depth
1
2
3
4
5
6
7
|
// Configure all streams to run at VGA resolution at 60 frames per second
dev->enable_stream(rs::stream::depth, 640, 480, rs::format::z16, 60);
dev->enable_stream(rs::stream::color, 640, 480, rs::format::rgb8, 60);
dev->enable_stream(rs::stream::infrared, 640, 480, rs::format::y8, 60);
try { dev->enable_stream(rs::stream::infrared2, 640, 480, rs::format::y8, 60); }
catch(...) { printf("Device does not provide infrared2 stream.\n"); }
dev->start();
| cs |
depth 카메라인 경우 16비트짜리 unsigned int형을 사용하고 color카메라는 RGB각각 8비트를 사용하는 포멧입니다. IR카메라인 경우는 8비트 짜리 gray 포멧입니다. 또 R200인 경우에만 IR카메라가 두개이므로 try문에 들어가 있습니다.설정이 끝난 후에는 start함수로 작동시킵니다.
연결하고 설정방법등이 매우 직관적이고 간편합니다. 그리고 프레임마다 이미지를 얻는 것도 매우 편합니다.
1
2
3
4
5
6
7
8
9
10
11
12
13
14
15
16
17
18
19
20
|
while(1)
{
// Wait for new frame data
dev->wait_for_frames()
// depth data
dev->get_frame_data(rs::stream::depth);
//color image
dev->get_frame_data(rs::stream::color);
//infrared image
dev->get_frame_data(rs::stream::infrared);
// second infrared image
if(dev->is_stream_enabled(rs::stream::infrared2))
{
dev->get_frame_data(rs::stream::infrared2);
}
}
| cs |
dev->get_frame_data()를 이용해 각 스트림을 얻어올 수 있습니다. 만약 opencv를 사용해 Mat형태로 메모리에 저장하고 사용하고 싶다면 밑의 코드와 같이 활용할 수 있습니다.
1
2
|
cv::Mat img(480, 640, CV_8UC3, (uchar3 *)dev->get_frame_data(rs::stream::color));
cv::Mat depth(480, 640, CV_16U, (uint16_t*)dev->get_frame_data(rs::stream::depth));
| cs |
그런데 color카메라와 depth카메라는 물리적으로 다른 곳에 설치되어있어 같은 픽셀 index가 같은 point를 가리키고 있지 않습니다. 그러므로 depth카메라를 color 카메라에 맞추던지, color를 depth카메라에 맞춘 후에 같은 index를 사용해야 하는데요. 그 작업을 카메라 사이의 extrinsic을 곱하는 등 복잡하게 할 필요없이 depth_aligned_to_color 나color_aligned_to_depth를 사용해서 같은 index로 같은 point정보를 얻어 올 수 있습니다.
그러나 카메라의 위치가 달라서 생긴 occlusion 부분의 정보는 얻을 수 없다는 단점이 있습니다.
1
2
|
cv::Mat img(480, 640, CV_8UC3, (uchar3 *)dev->get_frame_data(rs::stream::color));
cv::Mat depth(480, 640, CV_16U, (uint16_t*)dev->get_frame_data(rs::stream::depth_aligned_to_color));
| cs |
1 개의 댓글:
개의 댓글안녕하세요! 글 잘 읽었습니다. 글 읽던 중 궁금한게 있어서 여쭤봅니다. 현재 ubuntu 14.04를 사용중인데요, R200을 사용하고 싶습니다. librealsense를 사용하려고 했는데요, R200장치인식이 안되더군요(lsusb로 확인했습니다.). 아마 펌웨어가 안깔려서 그런것 같은데 깔려고 공식홈페이지를 방문해보니 window용 드라이버밖에 지원을 안하더군요. 혹시 ubuntu에서 R200을 사용하는 방법 아시나요??(즉, 펌웨어를 다운받을 수 있는 방법)
Reply